Uncategorized
How to Make Custom Car Floor Mats
May
A loose mat that slides under the pedals is not a custom mat. A thin universal piece that curls at the edges after one summer is not an upgrade either. If you are searching for how to make custom car floor mats, the real goal is simple – build something that fits your vehicle correctly, protects the cabin properly, and still looks premium every time the door opens.
For drivers who deal with dust, sand, daily wear, family traffic, or long commutes, the difference between a generic floor liner and a properly made custom mat is obvious within weeks. Fitment matters. Material matters. Edge finishing matters. And if you want a luxury result, the process matters just as much as the final shape.
How to make custom car floor mats the right way
Making custom car floor mats starts with understanding that there are two very different standards. One is DIY functional protection. The other is workshop-grade interior customization. Both can work, but they deliver very different results in appearance, lifespan, and cabin finish.
If you want a basic mat for temporary use, you can make one from automotive carpet and a simple rubber backing. If you want a tailored, premium look with raised coverage, stitched panels, heel pads, and a vehicle-specific fit, the work becomes much more precise. That is where factory-style production and pattern accuracy separate a clean upgrade from a rough homemade cutout.
Start with the correct mat style
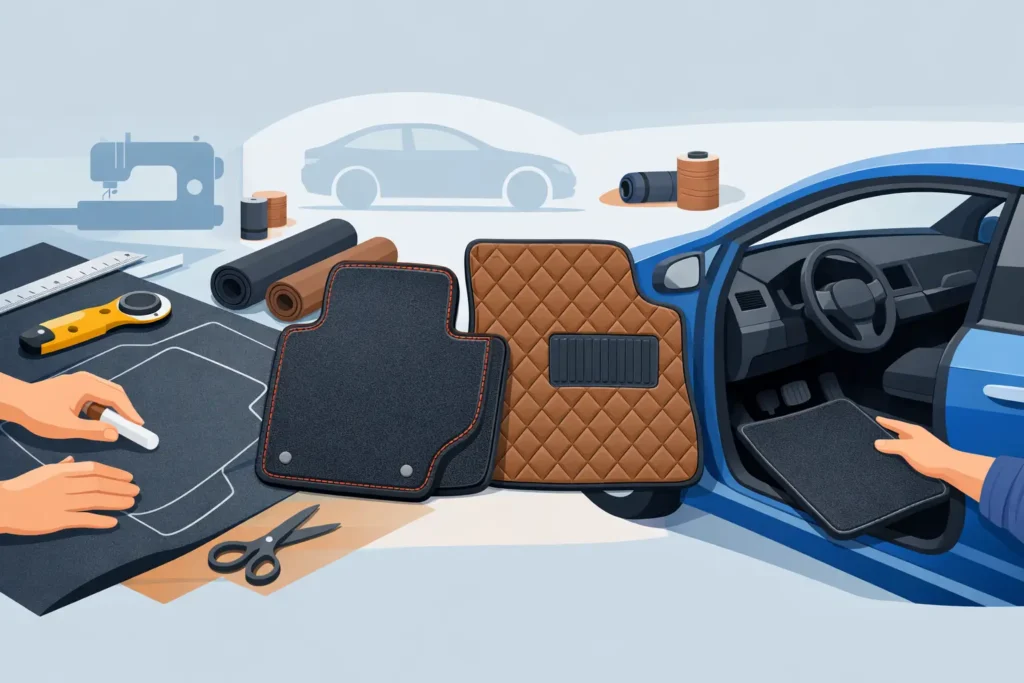
Before you buy material or trace a template, decide what kind of mat you are actually making. Flat carpet mats are the simplest. They are easier to cut, bind, and install, and they suit drivers who want a neat OEM-style appearance.
Layered leather-style mats are more complex. These usually include padded structure, stitched surface panels, side-wall coverage, and a shaped base that follows the contours of the vehicle floor. They offer stronger visual impact and better coverage, but they also require more accuracy and better materials. If your vehicle sees heavy use or you want a more premium cabin upgrade, this style usually delivers a better result.
Measure the floor area like a professional
The biggest mistake in how to make custom car floor mats is guessing the floor shape by eye. Car floors are rarely symmetrical. The driver side includes pedal clearance, seat rail exposure, and sometimes a dead pedal area. Rear floors can include a center hump, uneven edges, and seat mount interruptions.
The cleanest method is to create a full template before cutting the final material. Use heavy craft paper, cardboard sheets, or flexible template board. Lay it into the footwell, press it into the corners, and mark every edge carefully. Trim little by little until the template sits flat without bunching or shifting.
Be especially careful around the pedals. You want full coverage, but you do not want extra material rising into the pedal travel zone. This is where a custom mat can become unsafe if the shape is wrong. Leave proper clearance and test movement with the template in place before you move forward.
For rear mats, check whether you want a one-piece design across the full width or separate mats for left, right, and center sections. One-piece rear mats often look cleaner and provide better protection, but installation can be tighter depending on the vehicle.
Mark anchor points and retention clips
Many vehicles use factory floor mat hooks or retention clips. If your car has them, mark those positions on your template. A custom fit is not just about edge shape. It is also about keeping the mat locked in place.
If you skip anchor points, the mat may shift over time, especially on the driver side. That affects both safety and finish. A premium mat should sit flat, stay fixed, and look integrated with the vehicle interior.
Choose materials based on use, not just looks
Material choice decides how the mat performs in heat, dust, moisture, and daily cleaning. It also decides whether the finished piece looks entry-level or premium.
Automotive carpet is a common starting point because it is easier to cut and sew. It gives a traditional factory-style look, but quality varies. Lower-grade carpet can flatten quickly, trap dirt, and wear through at the heel area. If you go this route, choose dense automotive carpet made for cabin use rather than household or general-purpose fabric.
Rubber-backed or PVC-supported materials offer better moisture resistance. These are practical for high-traffic vehicles, family SUVs, and work-use interiors. They are easier to wipe down and usually hold up better in messy conditions.
Leather-style multilayer materials are popular for premium custom interiors because they combine structure, stitched design, water resistance, and a more upscale finish. They work especially well when you want side coverage and a tailored cabin look. The trade-off is that they are less forgiving to cut and fit. If the pattern is off, the final result will show it immediately.
Add a heel pad where wear happens first
The driver mat always takes the most abuse. If you are making a carpet-based custom mat, add a reinforced heel pad in the area under your right heel. This can be rubber, textured PVC, or an extra stitched layer.
Without that reinforcement, even a good-looking mat can wear out early. A mat should not only match the cabin. It should survive daily driving.
Cut, layer, and test before final finishing
Once your template is complete, transfer the shape onto the mat material using chalk or a silver marking pencil, depending on surface color. Cut slowly and stay just outside the line at first. You can always trim more. You cannot put material back.
If your mat design uses multiple layers, assemble them in the right order. A typical build might include a top surface, foam or padded middle section, and anti-slip bottom layer. Bonding and stitching both matter here. Glue alone may hold initially, but poor bonding tends to fail under heat and repeated flexing.
Before binding the edges, place the unfinished mat into the car and test every area. Check seat movement. Check pedal clearance. Check whether the edges lie flat against the floor contours. This test fit is where you catch small errors that would be expensive or impossible to fix after finishing.
Edge finishing changes the final look
A raw-cut edge makes even expensive material look unfinished. Bound edges, stitched trim, or wrapped borders give the mat its final shape and durability.
For carpet mats, edge binding is almost essential. It prevents fraying and gives a cleaner OEM-style finish. For leather-style mats, stitched perimeter finishing helps the mat hold its form and match the premium look of the cabin.
If your goal is a luxury result, this is not the place to cut corners. Uneven edging will stand out every time someone enters the vehicle.
Consider coverage, cleaning, and climate
A good custom mat should match how the vehicle is actually used. A sedan driven mostly in the city may only need elegant flat mats with solid retention. A family SUV, pickup, or ride-service vehicle usually benefits from higher side coverage and more water-resistant construction.
Climate also matters. In hot, dusty conditions, some materials fade, curl, or harden faster than others. That is why premium workshop-made mats often focus on waterproof surfaces, shaped side protection, and stronger base structure rather than just decorative top material.
If easy cleaning is a priority, avoid overly absorbent surfaces. If luxury appearance matters most, choose a finish that complements the seat color, door trims, and lower dashboard panels. Black, tan, beige, and diamond-stitched patterns remain popular because they give the cabin a more complete, upscale look.
When DIY works and when custom production is smarter
If you have the tools, patience, and a simple mat design in mind, making your own mats can be a practical project. It works best when you want a basic custom shape, already understand your vehicle floor layout, and are comfortable with cutting and finishing materials accurately.
But if you want model-specific precision, raised side coverage, premium stitching, and a result that looks factory-built rather than homemade, professional production is the better route. That is especially true for luxury cars, newer vehicles, and owners who care about resale value or cabin presentation.
A specialist workshop can pattern the floor correctly, select materials that suit real driving conditions, and build the mat as part of a full interior upgrade rather than as an isolated accessory. For buyers who want that premium standard, Sana Auto Services offers the kind of custom-fit, leather-style mat work that turns floor protection into a visible interior upgrade.
Small details make the difference
The best custom car floor mats are never just cut to size. They are shaped with purpose. They clear the pedals properly, lock into position, protect high-wear zones, and match the character of the interior.
That is the real answer to how to make custom car floor mats. Start with the right template, choose materials for the way you drive, and do not treat fit and finishing as small details. They are the whole product. If you want your cabin to look sharper every day and stay protected for the long haul, build the mat like it belongs in the car from day one.